

Super Saturday – January 30, 2027
A wonderful opportunity to sit and sew and learn and mingle with fellow members in a small sociable setting.
- $30 – Coffee and deli lunch included, $15 guest surcharge
- Any class specific questions, contact the teacher.
- Any general questions or guest attendee options, contact supersaturday@northernstarquilters.com
- Signup by credit card online, HERE.
- Signup by check (Northern Star Quilters Guild) at guild meetings or email your class request to supersaturday@northernstarquilters.com to get confirmation and mail instructions.
- If cancellation due to inclement weather, no snow date, registration refunded.
2027 Classes – details in progress
Sit N Sew
Reserved area available for those who want to setup and work on their own project.
Come join your guild friends in a comfortable space for a day of sewing and camaraderie!
Stacey Murren - Duffle Bag

Fabric:
- 1 yard for Main/Outside (If this is your first bag, do not pick directional fabric)
- 1 ¼ yards for lining
- 1 yard of internal and external binding, carrying handle
- 1 yard of byannie’s Soft and Stable (36×44) or 1 yard of batting
- 1 30″ double sided handbag zipper
- 3 yards of 1½ Polypro strapping. Get 5 yards of you want to make the over the shoulder strap
- You will need hardware if you are adding the over the shoulder strap – (2) 1½ triangle-rings, (2) 1½ swivel hooks, (1) 1½ strap adjuster
- Cotton Candy in Brookfield carries many bag supplies.
Supplies:
- Cutting mat
- Rotary cutter
- Quilter Ruler
- Scissors
- Sewing machine
- Size 14 needle
- Bring all your feet (zipper foot, blindstitch, and general sewing foot)
- Zipper tape (optional, but it makes it easier)
- Cotton thread to match the main and bias fabric
- Small container of Clover Wonder Clips
- Chalk wheel or Frixion pen
Pre-work before Class:
If possible, try to quilt the Main/Outside fabric 21” x 40½”. I usually begin with 23” x 43”, as it shrinks as you quilt.
Make a Duffle Bag in a Day!
Need the perfect weekend getaway bag or a stylish way to carry your quilting projects to sewing days with friends? Come join the fun and conquer your zipper fears! In this fast-paced, beginner-friendly workshop, you will learn easy, stress-free ways to install a zipper and walk away with a completed, roomy duffle bag by the end of the day.
The Patchwork Duffle by Knot + Thread Design digital pattern can be purchased online. It’s an easy pattern that can be made in day. It’s a perfect size and great for weekend getaways.
Questions, call or text 949.463.3559
Carolyn Salon - Paper Piecing

MATERIALS REQUIRED:
- Fabrics – A selection of small prints/solids lights/mediums/darks in fat quarters or equivalent surface area. Also scraps from previous quilts can work. We will be making a heart, a flower, and a star design.
- Neutral thread – grey or beige work well
- Paper scissors and fabric scissors
- Ruler for rotary cutting – small 6-12″ long
- Rotary cutter and small mat
- Pins
- Seam ripper
- Sewing machine with open toe foot
- Extension cord and /or a power strip
- Rolling seam presser if you have one. (There will be an iron available for all to use.)
- Paper bag for waste scraps and threads
- OPTIONAL: travel iron and mat to iron on
- Lightbox if you have one OR a lamp
- ¼” paper piecing ruler if you have one
- A paper pieced pattern you would like to make
PRE-CLASS WORK: Press fabric scraps so that they are flat
Learn Foundation Paper Piecing.
Foundation Paper Piecing is a piecing method using a paper pattern. It is extremely accurate in rendering an image in fabric.
In this class we will be making a heart, a flower, and a star design.
Questions, contact carolynsalon98@gmail.com
Maria Calderon-Weinstein - Placemats
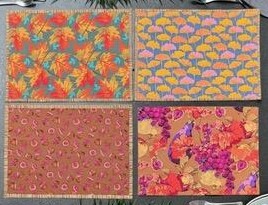
Fabric Requirements for 4 Placemats:
- Top fabric: ¾ yard
- Backing: ¾ yard
- Batting: ¾ yard
- Binding: 1/3 yard
Fabric Requirements for 8 Placemats:
- Top fabric: 1 1/3 of a yard
- Backing: 1 1/3 of a yard
- Batting: 1 1/3 yard
- Binding: 2/3 yard
Placemat Prep:
Prepare four or eight 14″ x 19″ quilt sandwiches*, each with a top, batting, and backing. This size is ideal for placemats. To hold each sandwich together, stitch a few diagonal or straight lines in both directions, spaced 2 inches apart. Placemats will finish 13″ x 18 “when done.
Pre-class homework:
- Make your quilt sandwiches
- Cut all the strips needed for the binding (wof=width of fabric)
1 – Economy Binding – Cut two 1½” strips by wof, sew the strips together end to end making one long strip.
2 – Amish Style Binding – Cut two 2¼” strips by wof. Do NOT sew the strips together.
3 – Facing Style Binding – Cut two 3” strips by wof. Do NOT sew the strips together
4 – Traditional Binding – Cut two strips 2¼” strips by wof. Sew the strips together end to end making one long strip. - Label your binding sets.
* A quilt sandwich has three layers: a top fabric, batting, and backing fabric. Place the batting between the top and backing fabrics, then secure all three layers with simple straight-line quilting, keeping them smooth and flat.
Tools Required:
- Sewing machine, please make sure that it is in working order.
- Rotary cutter
- 18 x 24 cutting mat
- ¼ inch foot + edge foot if you have one
- Any 2–6-inch square ruler with clearly marked ¼-inch increments
- Small fabric scissors
- Neutral thread
- Fabric glue
- Pins or Clover clips
- All the usual sewing supplies
- Consider bringing a small ironing pad and iron
- Please bring an extension cord or surge protector
Very important: Please do your homework, it saves time in class, you have paid to learn how to do binding not cut fabric.
Make Placemats with 4 Unique Bindings
In this workshop, you’ll make placemats while learning three nontraditional binding methods, along with the traditional technique. You will also learn to stitch your binding down by machine
- Economy Binding using 1½ inch strips
- Amish Style Binding doing Square Corner using 2¼ inch strips
- Facing Style Binding where no binding shows in front using a 3-inch strip
- Traditional Binding using 2¼ inch strips
Questions, contact tatavw01@yahoo.com
Patricia Loquet - Zipped Quilt

‘Zipped’ is an easy and beginner friendly quilt pattern.
It requires the same size rectangle throughout- 4” x 5 3/4”. Each block uses 8 rectangles and the blocks finish at 14”. The blocks can be planned or scrappy. Make sure your lights and darks have a good contrast. All blocks can be cut to size before the class.
Questions, contact loquetpatricia444@gmail.com
Karen Carlson - Memory Bear

What You’ll Need
Prior to class – Select a bear pattern, print, and cut out the paper pattern pieces for your chosen size.
Etsy has an assortment of digital patterns to download and print for just a few dollars, many based on out-of-print Simplicity pattern A2115. This is the Etsy pattern I am using from PARAESsewing, it includes many sizes and a decent set of instructions: etsy.com/listing/1310408910/memory-bear-pattern-video-tutorial-all. If you have a different pattern, you may need different supplies.
- Fabric: Roughly 1-2 yards depending on your fabric choices and bear size.
You can use one fabric or as many as you like: scraps, clothing, t-shirts, home dec, quilt pieces, table linens, …. - Interfacing: Lightweight fusible, eg. Pellon P44, enough for your chosen size pieces. Required for stretchy or lightweight or slippery fabrics. I like to use it in general.
- Eyes/Nose: Black – felt, fabric, embroidery thread, buttons, plastic eyes/noses. I’ve used plastic safety eyes/noses, found at craft stores and online.
- Stuffing: Fiberfill or whatever you like. The bigger the bear the more you’ll need. Finely chopped batting scraps or stuffing from old pillows could work as well.
- Markers: For tracing patterns and marking on fabric, fine pointed.
- Scissors: For cutting and clipping curves, sharp pointed.
- Sewing machine: One with enough power to sew thru your chosen fabric layers.
- Other stuff: extension cord, thread, needle, pins/clips, scissors, seam ripper, etc.
- Small iron and mat: for fusible interfacing. I will also bring an ironing board and iron.
- Small cutting mat and rotary cutter: optional, mostly need good scissors. I will bring a cutting mat and cutter.
Make your own stuffed bear.
Turn scraps or sentimental fabric into a personal keepsake! Purchase and print the online pattern and have fun gathering your fabrics.
Questions, contact quiltingkarend@aol.com